
Siteimprove CMS Plugin
Integration Cookbook
What Is the Siteimprove CMS Plugin?
The Siteimprove CMS Plugin bridges the gap between the CMS and the Siteimprove Intelligence Platform. You are able to put your Siteimprove results to use where they are most valuable – during your content creation and editing process.
With analytics and content insights always at hand, contributors can test, fix, and optimize their work continuously. Once the detected issues have been assessed, you can directly re-recheck the relevant page when it is published and see if further actions are needed.
When logged into the Siteimprove plugin, you are logged in to your Siteimprove account and the plugin works as an overlay to your normal CMS platform.
The plugin is only able to check published pages that are reachable by the Siteimprove crawler.
Who Is Siteimprove?
Siteimprove provides organizations of all shapes and sizes with a solution that makes website management, maintenance, and optimization both easier and more affordable.
The Siteimprove Intelligence Platform unlocks new insights into your content and analytics data to let you focus your efforts where they belong: prioritizing and tackling issues, tailoring content and design, and aligning digital metrics with organizational goals.
Getting Started
This cookbook should contain all the resource you need to get started.
What is required to start developing:
- Access to the CMS Plugin SDK
- An active Siteimprove account
- An active site setup in the Siteimprove tool
Functional Description
How the Javascript Overlay Works
At a high level we start with a thin integration with our Javascript based overlay. Our JS integration has 5 core functions that create an overlay (iframe) on the CMS and the data is exposed there. The Javascript will do nothing unless the functions within the Javascript are used. The Javascript is located at the URL: https://cdn.siteimprove.net/cms/overlay.js The Javascript should be partially loaded from the main layout, so it is accessible from every page and window in the CMS. The script can handle being loaded asynchronously, so it should be done using:
<script async src="https://cdn.siteimprove.net/cms/overlay.js"></script>The overlay has two main components: a site-wide overview and the page-specific detail when editing a page . The 5 core functions:
input(url, token, callback) takes two parameters and an optional callback, which will be called when data has been successfully fetched. It should only be used in a page-specific context in the CMS. The URL grabbed from the integration and the token grabbed from the token endpoint. This will request that our system get data for the specific URL. If the Siteimprove Plugin is shown, but can’t find a URL (or a scenario where it makes sense to display without a URL), an empty URL can be given and it will show the Siteimprove Plugin without any data.
domain(url, token, callback) takes 2-3 parameters: the URL of the domain, the token grabbed from the token endpoint, and an optional callback. This should be used in a context of a site or no site at all. The URL should be the index URL of the site, if the integration is able to find a specific site. Otherwise it should send an empty URL and a box will be shown that can be opened to view all sites currently in the Siteimprove platform.
clear(callback) takes an optional callback. If the Siteimprove Plugin is shown but can't find a URL (or a scenario where it makes sense to have it shown), this function can be called and it will show the Siteimprove Plugin without any data. recheck(url, token, callback) takes 2-3 parameters: the URL to recheck, the token grabbed from the token endpoint, and an optional callback that will be called when a recheck has been successfully ordered. This will request a recheck of the URL in our system. This is meant to be the publish hook.
recrawl(url, token, callback) takes 2-3 parameters: the URL of the page currently viewed (it can also be the domain of the site currently viewed - we will strip it down to the domain either way), the token grabbed from the endpoint, and an optional callback that will be called when a recrawl of the site has been successfully ordered. This will request a recrawl of the entire site in our system. This is meant to be the publish hook for a batch of many pages (e.g. an entire site). It also has one utility function, showlog(),with no parameters. This will show an internal log for the script, making possible to see what is going on inside the script.
This means that the CMS App/integration can input a URL, and even order a recheck, before the script is actually loaded. It can be an advantage to have an easy way to access the log of the script. This can be done by creating a bookmark with the following:
javascript:if(window._si !== undefined){window._si.push(['showlog','']);}Token
We need to bind a token to a CMS installation. This should be done by fetching a token from Siteimprove that we will connect to the CMS installation. The token should be fetched using the URL:
https://my2.siteimprove.com/auth/token?cms=nameOfCMSThe URL parameter “cms” is the name and version of the CMS, e.g. Drupal 8.
The token should be persisted in a way such that it is accessible from the CMS as it is needed when passing information to the Siteimprove Javascript. How to persist the token is a very open question, as many CMS have different ways of storing data. It should, however ,be persisted so it will not be deleted by accident.
Where Should This Work?
After installation, the plugin should appear on all pages in the CMS – including administrative pages, dashboards, and editorial pages. The plugin will require different information from the CMS on the different types of pages, but it should appear everywhere.
Initializing the plugin window ‘Small box’ on all pages can be done on the load of the layout before each function call, depending of the best practice of the CMS platform.
Example on how to initialize the plugin window:
var _si = window._si || [];Different Scenarios
In the following examples consider the token to be: 8669723c3a4e475cbe2b303b690a3db6 Basically there are three UI scenarios and 2 publish scenarios:
Non Content Context (Multiple sites in the same cms – unknown domain)
The user has multiple sites set up in the CMS and is working on a non-site-specific page, so the CMS will not know which site would be relevant for the user to see in the plugin.
The CMS should use the endpoint domain(url, token, callback) in the javascript but should send an empty url, and the plugin will show all the sites that the user has access to in the Siteimprove platform.
User Stories:
As a user of the CMS with the Siteimprove plugin installed, I can see the plugin without page details on pages in the CMS not related to page content, so that I can get general information from Siteimprove about my sites and history when I work in the CMS.
As a user of the CMS with the Siteimprove plugin installed, I can see the plugin without page details on pages in the CMS not related to page content, and if I am in a multiple site context in the CMS, no site should be preselected in the plugin, when entering the detailed view of the plugin.
Examples:

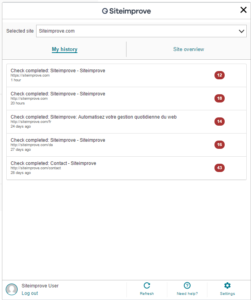
Small box example

Big box example
var _si = window._si || [];
  _si.push(['domain', '', '8669723c3a4e475cbe2b303b690a3db6', function() { console.log('Inputted
  empty string as domain to Siteimprove'); }])
Example request
Non-Content Context (known domain in the cms)
The user has multiple sites set up in the CMS and is working on a non site specific page, so the CMS will not know which site would be relevant for the user to see in the plugin.
The CMS should use the endpoint domain(url, token, callback) and send URL of the site domain, the plugin will show the information for that specific site. In the example above the known domain is http://siteimprove.com, so we pass that to the domain function.
User Stories:
As a user of the CMS with the Siteimprove plugin installed, I can see the plugin without page details on pages in the CMS not related to page content, so that I can get general information from Siteimprove about my sites and history when I work in the CMS.
As a user of the CMS with the Siteimprove plugin installed, I can see the plugin without page details on pages in the CMS not related to page content, and if I am in a Site specific context in the CMS that site should be preselected in the plugin, when entering the detailed view of the plugin.
Examples:
Small box example
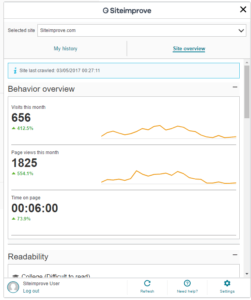
Big box example
var _si = window._si || []; _si.push([‘domain’, ‘http://siteimprove.com’, ‘8669723c3a4e475cbe2b303b690a3db6’, function() { console.log(‘Inputted specific Domain url to Siteimprove’); }])Example request
Page Content Context (known page/content url)
The CMS should use the endpoint input(url, token, callback) and send the URL specific page, the plugin will show the information for that specific page. In the example above the known domain is http://siteimprove.com/fr, so we pass that to the domain function.When the user is working on or viewing a single content page in the CMS we want to show information related to this page in the plugin.
User Story:
As a user of the CMS with the Siteimprove plugin installed, I can see the plugin with page details on pages in the CMS that is related to page content, so that I can get detailed information from Siteimprove about the page that am currently working on in the CMS.
Examples:
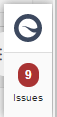
Small box example with issues count
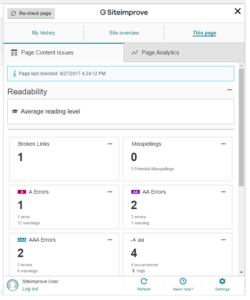
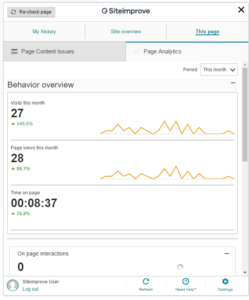
Big box example: Content and Analytics for single page also available
var _si = window._si || [];
  _si.push(['input', 'http://siteimprove.com/fr', '8669723c3a4e475cbe2b303b690a3db6', function()
  { console.log('Inputted page specific url to Siteimprove'); }])
Example request
Publishing From the CMS Publish Single Page
When publishing a page in the CMS, use the endpoint recheck to make sure that the Siteimprove platform analyzes the updated/new content and show the new results in the plugin. The URL is passed to recheck function and it will tell Siteimprove to recheck this URL.
Direct Publish
var _si = window._si || [];
 _si.push(['recheck', 'http://siteimprove.com/fr','8669723c3a4e475cbe2b303b690a3db6', function() { console.log('Recheck ordered'); }])
Server or Workflow Publish
{ "url": "url", "token": "token", "type": "recheck" }User Story:
As a user of the CMS with the Siteimprove plugin installed, I would like to see the plugin with page details getting updated, when I publish a page, so that I can make sure that the newly published content is working as supposed to.
Publish Multiple Pages
When publishing a larger section of the site, or the whole site, in the CMS, use the endpoint recrawl to make sure that the Siteimprove platform analyzes the updated/new content and show the new results in the plugin. The URL of the domain (or if we have a more specific URL) should be passed to the recrawl function. If a more specific URL like http://siteimprove.com/fr is passed, Siteimprove will map it to the closest related site registered in Siteimprove.
Note: This could take a while, depending on the size of the site.
Direct Publish
var _si = window._si || [];
  _si.push(['recrawl', 'http://siteimprove.com','8669723c3a4e475cbe2b303b690a3db6', function() { console.log('Recrawl ordered'); }])
Server or Workflow Publish:
{ "url": "url", "token": "token", "type": "recrawl" }User Story:
As a user of the CMS with the Siteimprove plugin installed, I would like to see the plugin with page details getting updated, when I publish new site or a larger section of a site, so that I can make sure that the newly published content is working as supposed to.
Other User Stories on General Functionality
As a user of the CMS with the Siteimprove plugin installed, I can see the plugin on all pages in the CMS, so that I can get information from Siteimprove where I work in the CMS.
As a administrator of the CMS platform, I should be able to install the Siteimprove plugin the same way as you would normally install a plugin on this CMS, to avoid confusion.
As a administrator of the CMS platform, I should be able to uninstall the Siteimprove plugin the same way as you would normally uninstall a plugin on this CMS, and see that it is successfully removed from the CMS.
Final Product Deliverables
- Full installable package installation instructions
- Documentation
- Validation and marketplace approval
- Test